If you want to stand out in such a large game as Roblox, you’re going to want to make sure to take a creative approach to your outfits. On top of a catchy name, good hair, and other smaller factors, a nice shirt design just ties your general build together. But how do you actually create a new shirt for your character? There are multiple steps you need to take and the whole process can seem somewhat daunting, but that’s where we step in!
Complete with a general guide on how to create shirts, and some very nice examples of community-sourced shirts, this article will make sure you know everything when it comes to Roblox shirt templates and their use. The process is not as scary as it seems, and you’ll be making your own fashion line in no time.
If you like character customization and modifying your look, we’re sure you’re going to like this article. Also, if you’re a fan of playing fun, interesting mini-games within Roblox, make sure to check out some of our other informative articles, like Aincrad Adventure codes, Aether Rush codes, and Wacky Wizards codes.
What are Roblox shirt templates
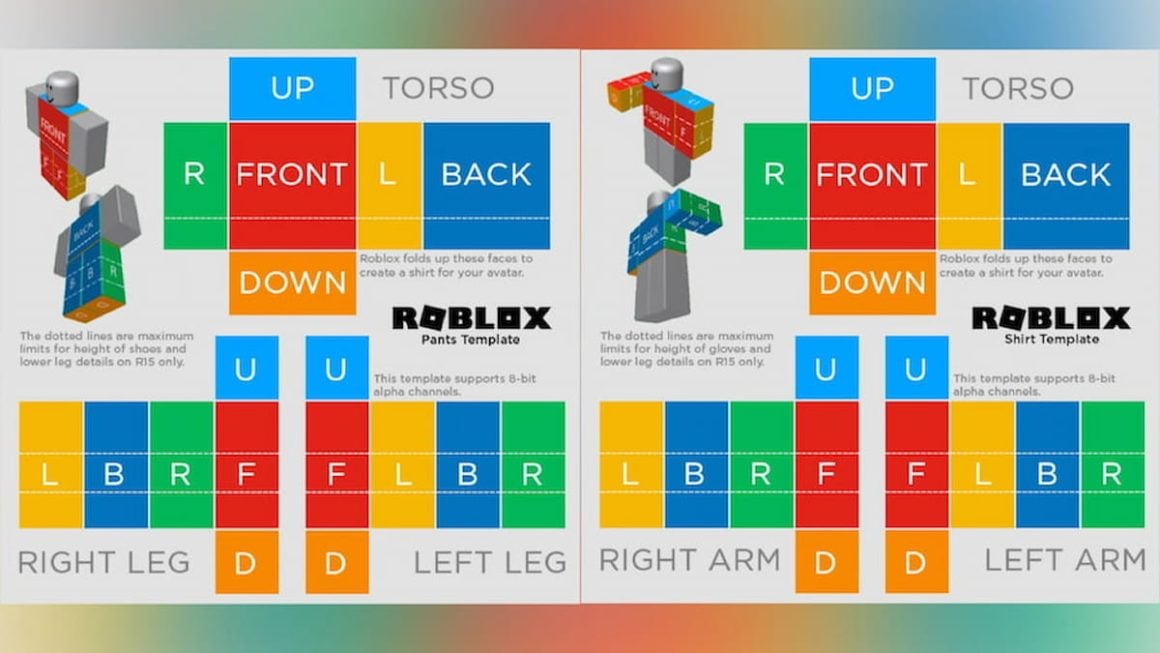
Shirt templates allow you to create your own clothes via image editors and simply add images/textures to the predetermined fields of the template here. This is the base template and you can create both long-sleeved shirts and T-shirts. You can make any number of T-shirts for free, but you do need a premium membership to create long-sleeved shirts.
How to create Roblox shirt and Roblox pants?
The easiest clothing article to create is a T-shirt since it is only the front and back of your character, so you can just use one image for both. When it comes to creating long-sleeved shirts and pants, you need to be a bit more detailed. These articles have more fields to fill, so you need to manually add an image for each plane available. For example, if you wanted to create a long-sleeved shirt, you would need to find an image and add it to the front, back, shoulder, and hand of each arm. While it does take a bit more time to do, it is not too difficult and anyone can do it. To create images, you can use any image editing software such as GIMP and Photoshop, so it doesn’t take too long.
The process looks like this:
- Open your preferred image editing software (Photoshop, for example)
- Create the specific design you had in mind
- Use the template to apply the design to each plane, making sure that all images are the proper dimensions
- Front and back of your torso is 128×128 pixels
- The sides of your torso and your arms are 64×128 pixels
- The top and the bottom of your torso is 128×64 pixels
- Your shoulders and hands should be 64×64 pixels
- As soon as you finish with the template you can save it and upload the clothes to Roblox
How to upload your clothes to Roblox
- Use the template and image editing software to create you clothing of choice
- Go to the Create page
- Select the type of your clothing
- Choose file
- Give it a name
- Upload
When you’re trying to make clothes, it is important to be creative and think outside of the box. With the entire Internet at your disposal, you can create excellent clothes with a little effort on the editing part. After you’re done, the clothes are a means by which people can recognize you and how you can create a name for yourself in whichever game modes you like to play. If you want to skip the editing part, you can always purchase pre-made shirt templates from the Roblox catalog. Some notable ones are Cool Electro Swag Rainbow, Adidas Red Camo Split, and Blue Galaxy Hoodie. Also, if you have enjoyed this article you can check out some others, like Roblox promo codes and best gacha games 2024!