Like any great social deduction game, Among Us requires a great degree of self-awareness and confidence, as well as an extensive grasp of the rules of play. But true mastery of Among Us can only come with an intimate understanding of the game’s maps, and that means memorizing vent locations and knowing where all the hiding spots and security cameras are.
Both Crew and Impostors should know the ins and outs of every Among Us map. If you’re Crew, a misstep could lead to a knife in the back, and for Impostors, knowledge of key locations can spell the difference between an easy win and fighting for your life at the next meeting. This Among Us map guide will help you glide through the game’s four maps, whether you’re a cold-blooded killer looking for a quick escape route or a Crewmate with a sneaking suspicion that you’re being shadowed by a stabby alien parasite.
Can’t get enough Among Us content? We’ve got tons of awesome Among Us guides and articles for you such as Among Us character, Among Us unblocked and Among Us toys.
The Among Us maps
1. The Skeld
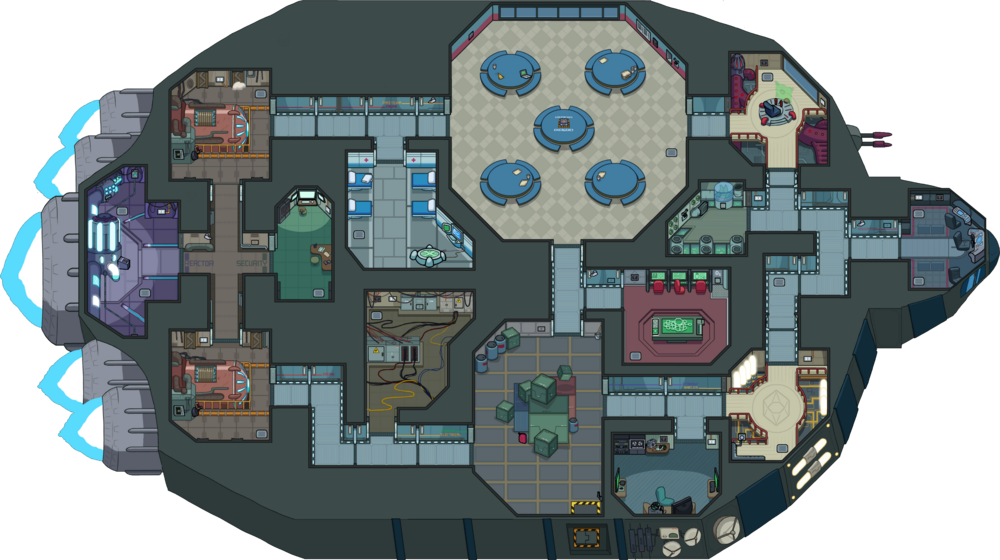
The Skeld is a relatively small map with a simple layout, making it an excellent introduction to Among Us. As with any map, communication and a well-planned route is key to the Crew’s survival. If you haven’t yet, memorize the different room names and what tasks are performed in them. This knowledge will allow you to roughly plot out a route for your tasks so you can knock them out with relative efficiency. One easy method is to move around the map either clockwise or counterclockwise, completing tasks as you go.
As always, you want at least one witness with you at all times to vouch for your innocence in case something goes wrong. Be sure other Crewmates can see any visual tasks you complete, so they know you’re not an Impostor faking a task. The sooner you can establish your innocence the better, as this gives you leverage during meetings.
The Skeld is the default map in Among Us and where new players come to cut their teeth. This means it’s generally easier to identify Impostors (look out for players that roam the map alone or jump into vents without discretion). This also means an experienced Impostor who knows the map can do quite well, even if their social manipulation game is sub-par.
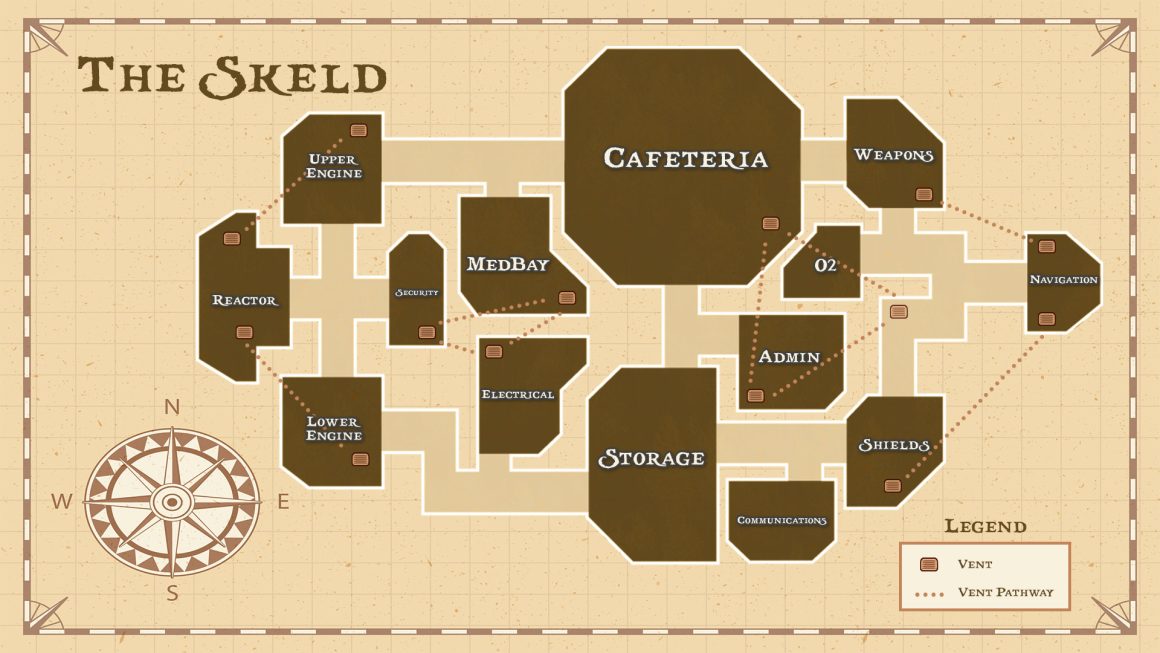
As the above map shows, The Skeld’s 14 vents are grouped into rough triangle zones. A rule of thumb for Impostor play is to avoid using vents unless absolutely necessary, such as making a quick escape, or to avoid being caught out in compromising situations.
If you’re fast enough, you can also use the vents to establish a case for your innocence. Say, for instance, that you’re in Navigation with a group of Crew and you want to take out someone roaming solo in Admin. Stick around in Navigation for a bit to make sure the others can see you, then make your way to the hallway vent outside of Shields to sneak into Admin and strike.
2. MIRA HQ
MIRA HQ is a smaller and more personal map than The Skeld and best played with small- to medium-sized groups. At larger group sizes, it gets very hard for the Impostor to make any move without being seen by a Crewmate. The lack of pathways and alternative routes also makes it very hard to avoid running into other players.
The single most important room for both Crew and Impostors is the Communications room. From here, players can see location logs for every player in the game. Crew can use this information to track suspicious individuals, and Impostors can take a quick glace at it to identify vulnerable targets.
To make up for the straightforward hallway layout and lack of multiple routing options, the vents in MIRA HQ are all interconnected, allowing Impostors to quickly travel across rooms. This means Impostors have much more freedom to roam than Crew, and if you’re ever alone in a room, an Impostor can be there in a snap to put a knife in your back.
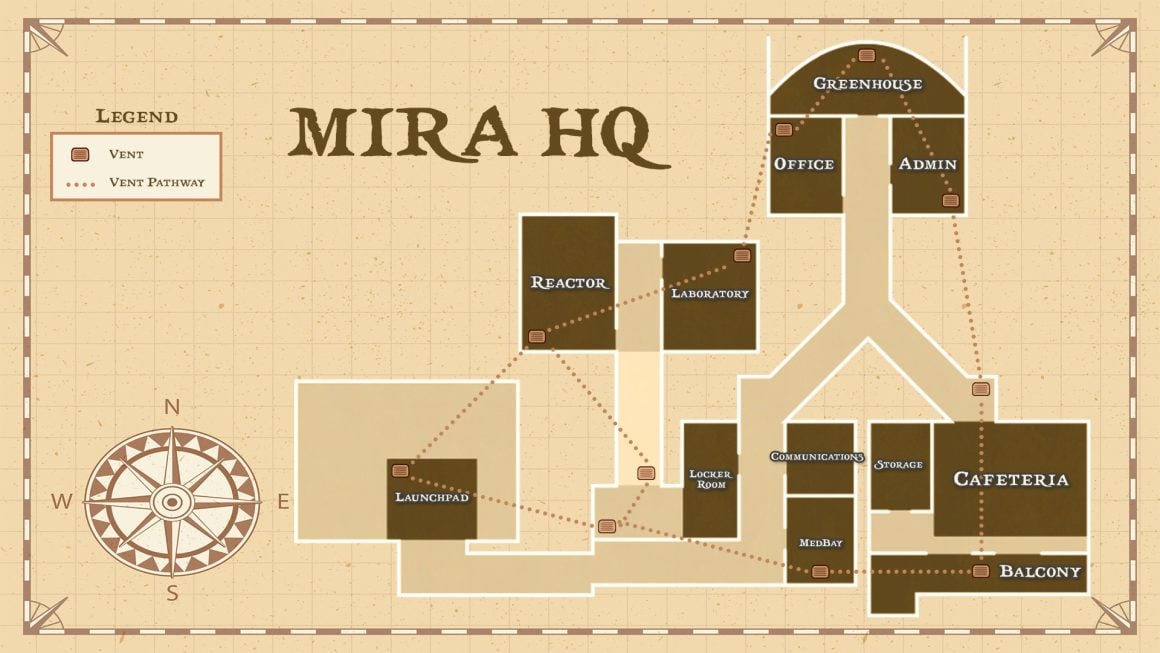
Conversely, the tight quarters can make it very hard for Impostors to isolate targets, which makes traveling in groups even more effective here than in any other map. If you’re Impostor, you can actually use the small play area to your advantage. You’re bound to be seen if you stick around anywhere for long enough, so if you time your vent movements properly, you can always have a witness to vouch for your innocence.
The Decontamination hallway, which is the long blue and yellow strip connecting the Reactor and Locker Room, is a hot zone for murders. This is because anyone passing through the hallway must undergo a short decontamination process before they’re allowed to move onto the next area. Watch your back for anyone tailing you near decontamination, and don’t go in there unless it’s with someone you’re certain is Crew. If it’s still early in the round and you aren’t sure who’s Crew, always go in with at least three other people in case there’s an Impostor.
The confined spaces and straightforward pathways of MIRA HQ can be claustrophobic to many players, so give yourself some time to get used to all the area names and vent locations.
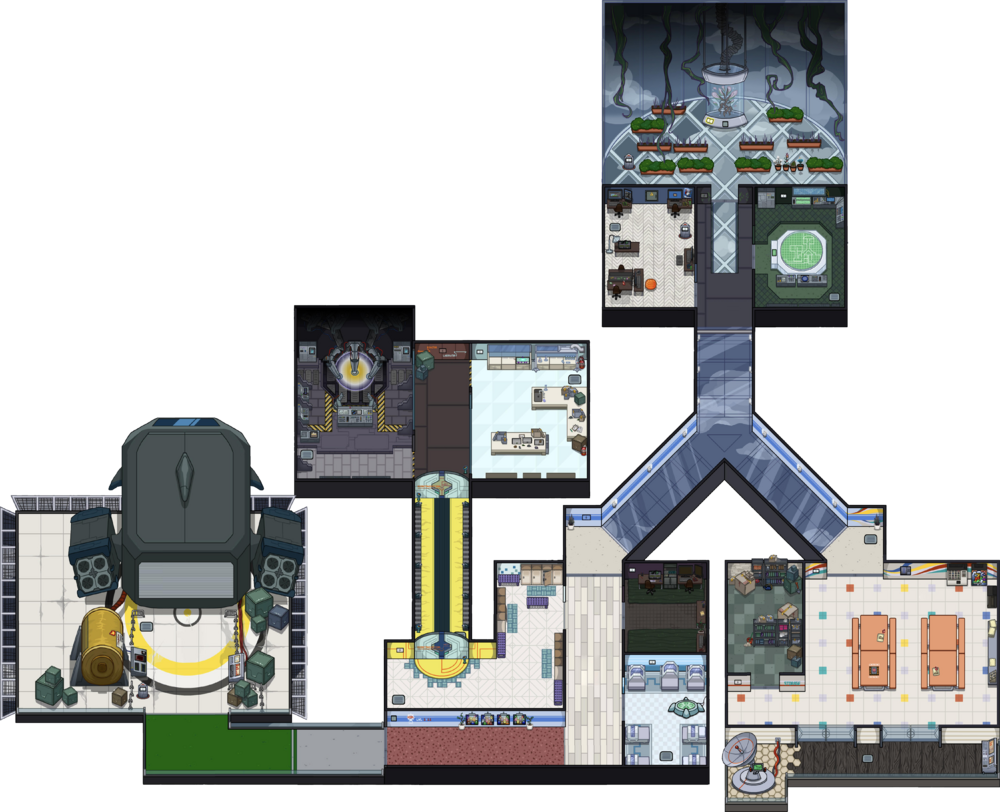
3. Polus
If you’ve been spending most of your time in the compact game spaces that are The Skeld and MIRA HQ, then you’ll likely find Polus’ size dizzying. Polus is the second largest map in Among Us and requires players to traverse both the inside and outside of a remote research outpost in space. As the largest area in the game, players on Polus may go inside and outside an arctic outpost.
For Crewmates, that much travel time between areas is frightening. Unless you’re playing with a very large group, you’ll find you spend an uncomfortable amount of time on Polus walking alone. You also won’t like that Polus requires you spend so much time in decontamination chambers, which must be passed through before entering any of the planet’s structures.
Polus has a total of twelve vents (represented as holes in the ground here). Just like in The Skeld, the vents are connected in isolated triangle formations, allowing for fast travel within localized regions of the map. There are no vents connecting to the bottom-left or bottom-right corners of the map. If you’re an Impostor, you’ll want to be very careful not to be caught out performing a kill in those areas, as there is no quick route for escape.
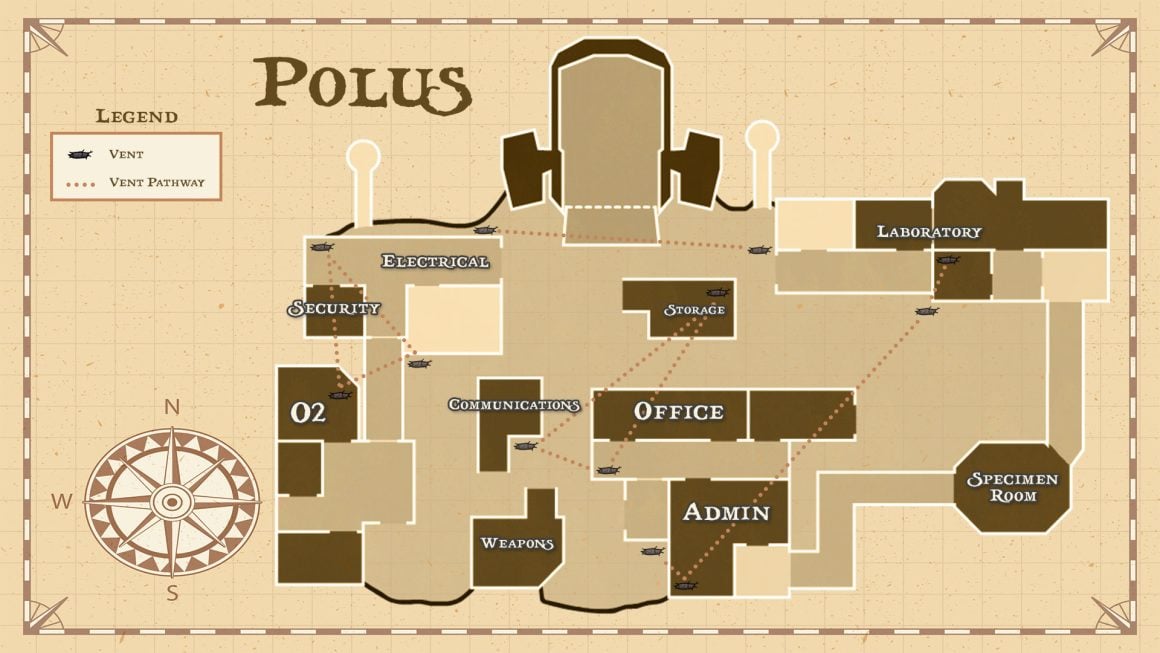
Due to vent placement, the southern areas of the map are generally much safer for Crew than the north. Crew will also want to spend as little time as possible moving in and out of buildings, due to the lengthy decontamination process. The vents allow Impostors to quickly jump in and out of buildings and bypass decontamination, so if you’re spied entering or leaving a building alone, you may find a killer waiting on the other side of the chamber.
For Impostors, use the vents to gather intel on player locations around the map. The one room you’ll want to always check in on is Admin, as there’s usually at least one person in there watching the cameras. If you can get an isolated kill without being caught on camera, the long decontamination times guarantee you’ll be able to get away from the crime scene before someone discovers the body.
4. The Airship
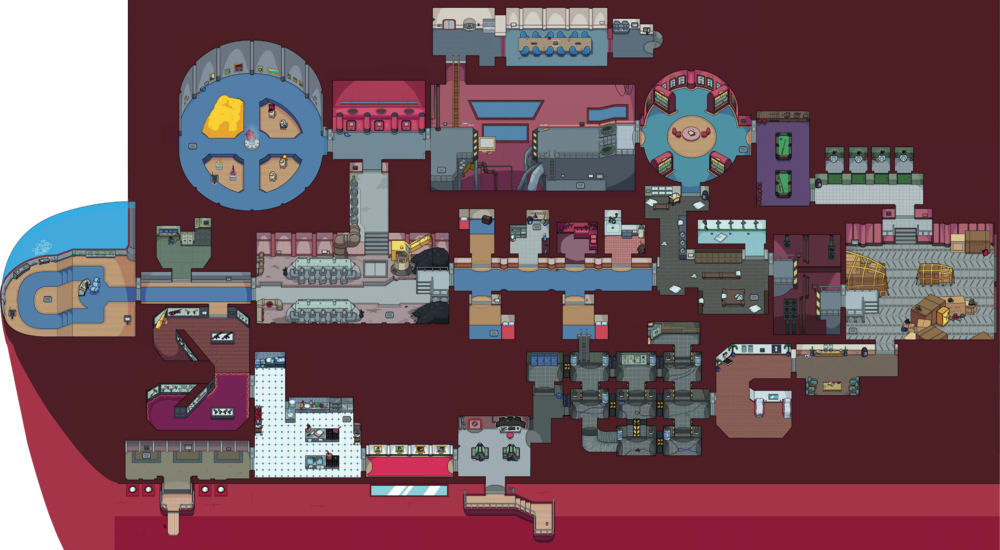
The Airship is easily the largest map in the game, with multiple stories and more than a dozen rooms. Due to the map’s sheer size, it’s best played with groups of 10 or more players. Players can travel between the different levels from the Gap Room, which houses a floating platform and ladders.
Because of how big it is, Impostors have plenty of space to move about undetected. If you’re Crew, you have to stay focused — a single slip of judgment or wrong turn can wind up with you isolated from any help.
Crewmates should make good use of the ship’s Security terminal, which allows players to keep tabs of player movements between rooms. A careless Impostor can be easily caught in the act through the camera system. Whenever possible, there should be a Crewmate in the Cockpit watching the ship’s large monitor, which displays the whereabouts of any living players.
Just like in The Skeld, the vents are separated into three-point triangle clusters. If you’re an Impostor, you can cover the most space by making use of the large vent system on the west side of the map to hop between the Vault, Cockpit, and Viewing Deck. Crewmates hanging out in the Cockpit can be caught out here if you time your movements correctly.
Impostors should also make good use of the Records-Cargo Bay-Showers vent triangle on the east side of the ship to catch players roaming nearby the Lounge. For instance, if you catch a player heading into the Lounge from Records, you can use the vent to jump to Cargo Bay, where you’ll be waiting to strike.
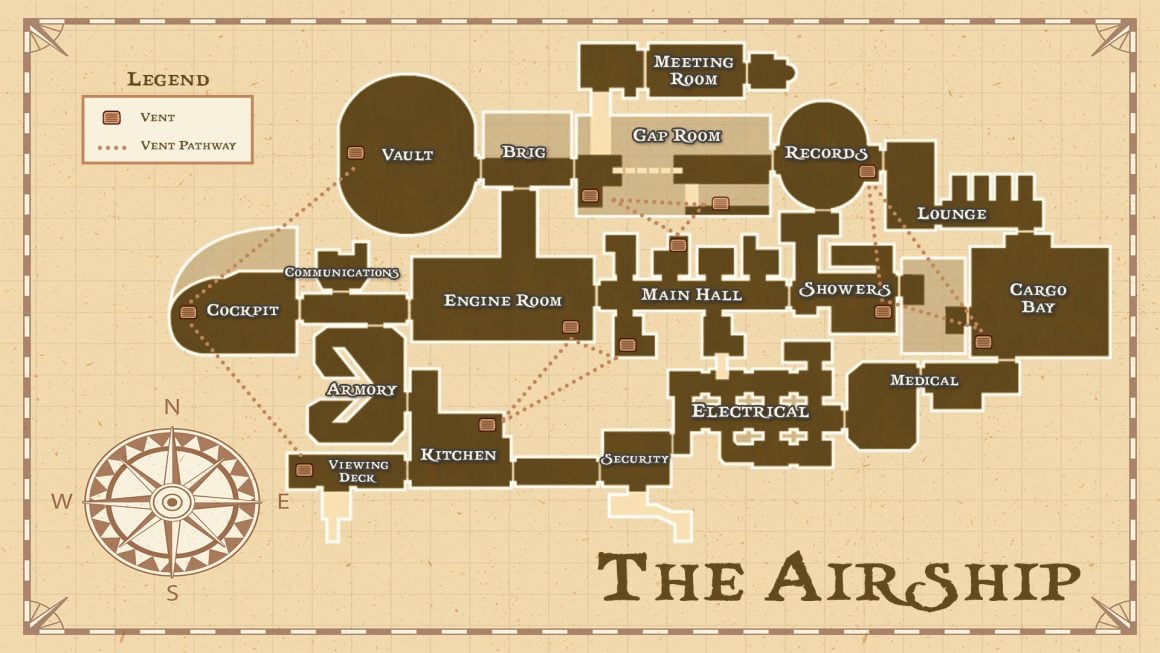
Electrical can be a death trap for hapless Crewmates due to its maze-like pathways. Impostors love to corner players here, isolating them away from their friends for an easy kill.
Since there’s no vent pathway to Security, Impostors can monitor the terminal in Security from Terminal, killing anyone distracted by the cameras then making a hasty getaway to Electrical. Impostors should take care not to kill anyone on the balcony area just south of Security, though. There is no escape route from here, and you can easily find yourself cornered by Crewmates.
You can tell that a lot of care and detail went into designing every Among Us map, and the tips we’ve provided here are only the tip of the iceberg when it comes to mastering the nuance of Among Us gameplay. To help you get a feel for the different maps, try having these vent pathway maps at the ready on a separate tab or screen for quick reference while playing. Don’t rush yourself and enjoy the learning process!
If you loved this Among Us guide, then we have a lot of other Among Us content that you should study. We’re sure it’ll make you an unbeatable force to reckon with! Check out Among Us Imposter, Among Us download and Among Us hats.